Invoice vs. Receipt: What’s the Difference and Which Should Your Business Use?
You’re the strategist, the marketer, and the customer service rep. When it comes to getting paid, you’re the accountant, too.
That’s why continuous improvement isn’t just about growing your core skills. It’s about building solid systems in every area of your business—payments included.
In this article, we’ll explain invoice vs. receipt and their differences.
Then, we’ll jump into when to use an invoice and how to write one. We’ll do the same for receipts.
Next, we’ll show why using both invoices and receipts is the best choice for businesses. We’ll make it easier for you, too, with some time-saving tips.
Finally, we’ll finish with some actionable steps you can take today. Let’s get started.
The Difference Between an Invoice and a Receipt
Invoice vs. receipt—what makes them different from one another?
Let’s start with the basics.
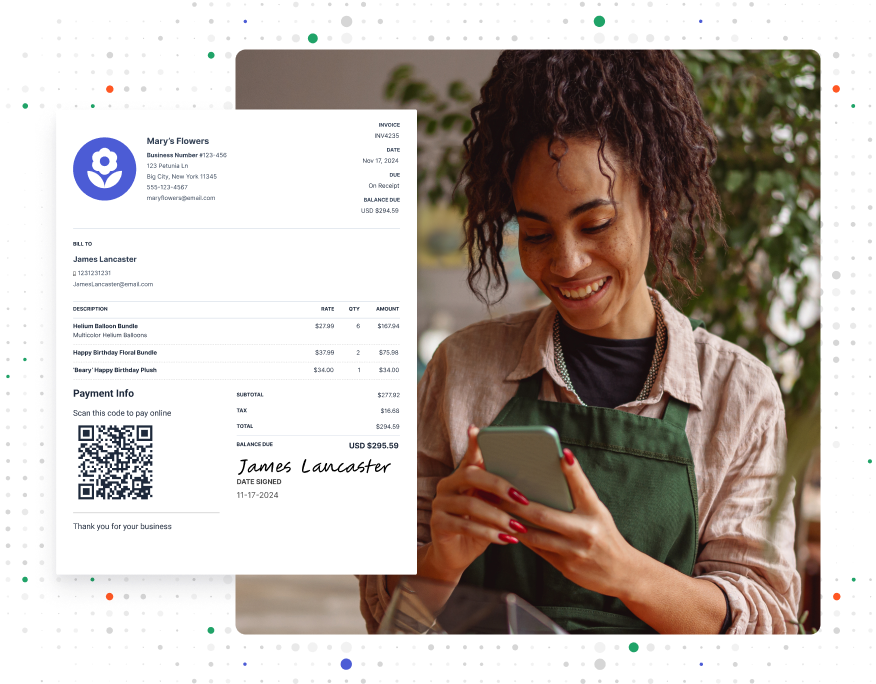
An invoice is like a bill. It asks for payment. Alongside the amount due, it includes things like how many hours you worked and the materials you used.
In contrast, a receipt is a record of a transaction. It’s issued after payment, not before. It includes things like the amount that was paid and the date it was paid.
Now, let’s take a closer look at the differences and similarities between these two important documents.
| Feature | Invoice | Receipt |
| Purpose | Requests payment for goods or services | Confirms payment has been received |
| Timing | Sent before payment is made | Issued after payment is made |
| Includes | Amount due, itemized breakdown, due date, payment terms | Amount paid, payment method, date of transaction |
| Issued By | Seller or service provider | Seller or service provider |
| Issued To | Buyer or client | Buyer or client |
| Use | A payment request and can be used for accounting or tax purposes | Proof of purchase or expense record |
When to Use an Invoice

Getting paid can be a tricky part of running your own business or working as a freelancer. It’s up to you to request payment from your clients. Most of the time, you’ll use an invoice to do just that.
Remember, an invoice is a document that asks your clients to pay you. So, with that in mind, here are a couple of scenarios in which sending an invoice makes smart business sense:
Scenario 1: You’ve Completed a Project
You’ve wrapped up the work and delivered everything as promised. Now it’s time to get paid.
This is the most common reason to send an invoice. Whether you’re a freelancer or a service provider, an invoice makes it official. It outlines what you did, how much is owed, and when payment is due.
Without it, clients might forget or (in the worst case) conveniently “overlook” what they owe you.
Scenario 2: You’re Requesting a Deposit
Some projects require upfront costs, and you don’t want to be out of pocket.
If you’re taking on a big job and need to order materials, a deposit invoice ensures you’re covered. It secures your commitment and sets expectations. It also filters out clients who aren’t serious.
Scenario 3: You’re Charging in Stages
Not every job is one-and-done in a couple of hours. Some projects stretch over weeks or months. Waiting until the very end to invoice can financially strain your business.
If you’re working on an ongoing basis—like consulting on a long-term project or delivering services in phases—sending invoices at key milestones keeps your cash flowing. It also reassures you and your client that everything is progressing as expected.
FROM ONE OF OUR PARTNERS: How To Invoice Online In 5 Easy Steps
How to Write an Invoice
Now that you know what an invoice is, let’s learn how to create one.
1. Start With Your Business Information
Put your business name, address, phone number, and email at the top of the invoice. If you have a logo, include that, too.
This helps establish your brand and makes it easy for the customer to identify who the invoice is from.
Pro tip: If you send invoices often, use invoicing software. This will automatically fill in your business details. Time savings are always a big win.
2. Add the Customer’s Information
Below your business information, write the customer’s name and contact details. This helps ensure you’re sending the invoice to the right person.
Check that all the information is accurate to avoid any confusion or payment delays.
3. Assign a Unique Invoice Number
Give each invoice a unique number to make it easier to organize your invoices and refer to them later if needed. This could be as simple as “Invoice #001” and count from there.
Pro tip: Use a consistent invoice numbering system that includes the date or project code.
4. Include Dates
Note the date you created the invoice and the payment date. This helps both you and the customer stay on top of payment deadlines.
Pro tip: Send your invoice as soon as possible after finishing up the job. Delaying invoices leads to delayed payments.
5. List the Goods or Services Provided
Make a clear, itemized list of what the customer is paying for. Include a brief description of each item, the quantity, and the price. This breakdown helps the customer understand the charges, which can reduce disputes or questions later on.
6. Calculate the Total Amount Due
Add up the cost of all items, including any taxes or fees. Clearly display the total amount owed at the bottom of the invoice. Double-check your math
7. Clarify Payment Terms
Explain how you want to be paid (cash, check, credit card, etc.). Include where to send the payment and outline any late fees or interest charges that may apply.
Detailed payment instructions help you get paid faster and avoid misunderstandings.
FROM ONE OF OUR PARTNERS: The 9 Essential Elements of a Small Business Invoice
When to Use a Receipt

Getting paid is great. Keeping track of it? Less exciting—but absolutely necessary.
You’ll need to issue a receipt whenever:
- A customer makes a full or partial payment for a product or service
- A client requests proof of payment for their records
Providing a receipt isn’t just about wrapping up a transaction. It also:
- Builds trust by confirming the payment was received
- Helps with tax compliance by documenting income
- Makes expense tracking easier for both you and your customers
Speaking of expense tracking, receipts are a must-have for small businesses when it comes to managing cash flow.
They serve as proof of what was spent, where, and when—all crucial for reconciling accounts. This also helps with tax deductions.
How to Write a Receipt
Receipts may be small, but they play a big role in keeping your business running smoothly.
Here’s a step-by-step guide to writing a complete receipt:
1. Include Your Business Information
Start by putting your business name and contact details at the top of the receipt. This helps the customer remember where they made the purchase and how to reach you if needed.
Pro tip: You might need to include your EIN (Employer Identification Number) or state-issued sales tax ID on receipts. If you’re not sure, contact your local tax authority.
2. Add the Date and Time
Note the date and time of the transaction. This is important for recordkeeping and can help resolve any issues that may come up later.
3. Assign a Unique Receipt Number
Give each receipt a unique number, just like with invoices. Invoice numbers organize your sales and make it easier to find specific transactions.
Pro tip: Use a simple numbering system like “R-1001” and increase from there.
4. List the Items or Services Sold
Write down what the customer bought, including a brief description and the quantity of each item. If you sold services, describe what you did and how much time you spent on each task.
5. Include the Prices
Next to each item or service, write down the price. Make sure to include any sales tax charged.
6. Calculate the Total
Add up all the prices to get the total amount the customer paid. Double-check to make sure everything is correct.
7. Note the Payment Method
Write down how the customer paid, whether by cash, credit card, or another method.
Pro Tip: If a customer pays by card, don’t store complete credit card details—list the last four digits and the transaction ID from your payment processor. That way, you can track payments while staying PCI-compliant.
8. Sign and Give to the Customer
Finally, sign the receipt and give it to the customer.
RELATED ARTICLE: How to Write a Receipt of Payment: Best Practices
Benefits of Using Both Invoices and Receipts

Which should you use—invoices or receipts? The right answer is both!
Invoices and receipts play essential but very different roles. One asks for payment. The other confirms it was received.
Combining the two makes your record of transactions straightforward and easy to navigate. Here’s how:
- Tracks what’s owed vs. what’s paid: An invoice tells you what money is coming in. A receipt confirms what’s actually been received. Together, they help you spot missing payments before they become a problem.
- Makes tax time less painful: Having both invoices and receipts means you’ve got everything you need to report income and claim deductions.
- Simplifies disputes and chargebacks: Say a client forgets they paid (or claims they didn’t). You can quickly pull up the invoice and receipt to clear up any confusion.
- Gives you a professional edge: Using both shows clients you’re organized and serious about your business. Clear, professional documentation builds trust—and makes you look like the pro you are.
RELATED ARTICLE: A Guide to Common Types of Invoices and Price Quotes
Tips for Streamlining Invoicing and Receipting
Invoicing and receipting are must-dos for any business, but they can eat up precious time. The faster you can handle them, the more time you have for growth and exciting opportunities.
The solution? Invoicing and receipt software like Invoice Simple.
These tools automate calculations and check for accuracy. They also keep records organized—so you don’t have to. The benefits?
- Generate invoices instantly using templates instead of building them from scratch
- Keep everything in one place to track payments and follow up when needed
- Convert invoices into receipts automatically, saving time and reducing errors
- Simplify tax calculations and recordkeeping, making bookkeeping far easier
As a bonus, software like Invoice Simple makes tracking business expenses easier than ever. Instead of keeping stacks of receipts, you can scan and store them digitally. This means they are easily searchable.
Takeaways for Invoices vs. Receipts
Make the most of your payment documents with these quick tips:
- Consider how you currently use invoices and receipts. Could you send invoices faster? How about automating receipt generation?
- Check that you’re including all the important information on your invoices and receipts. If not, make a note to add it in.
- Research invoicing and receipting software. Think about how much time you could save—and what you could do instead.
Start Your First
Invoice Today
Create customized and professional
invoices and connect with clients